
A Simple Spring Boot Model View Controller (MVC) Example
Overview
Spring is a large, time tested, Java ecosystem for Java Web and application development. Within Spring, the Spring MVC framework supports the construction of Web applications that leverage Java Server Pages (JSP).
Model-View-Controller Web Application Architecture
The Model-View-Controller (MVC) architecture for building web applications is one of the oldest paradigms in computer science. The MVC architecture for web applications is supported by the Spring MVC component of the Spring framework.
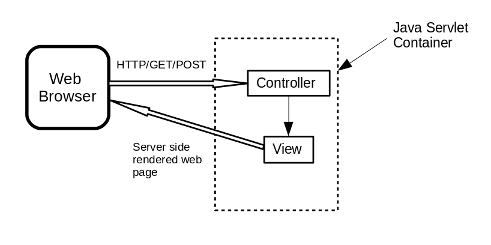
An HTTP request is sent to the Java Servlet container (e.g., Tomcat, Jetty, etc...) The HTTP request is first intercepted by the controller written in Java. The controller returns a Java Server Page (JSP) which is rendered on the server and returned to the web browser as static HTML.
The diagram below shows how a Java MVC application interacts with the client side of the web application in a web browser.
A Simple Spring MVC Example
Spring Boot and Spring MVC are in the top five most popular Java web and application development frameworks. The downside of these open source frameworks is that they can have a steep learning curve. Both Spring Boot and Spring VMC have been under rapid development in the last few years. Books and other references that were written only a few years ago are out of date, since they refer to previous versions of Spring and Spring MVC.
This paper outlines a very simple Spring Boot/Spring MVC application that can help new Spring MVC developers on their path toward Spring based web applications.
Spring Tool Suite Eclipse IDE
Pivotal, the core developer of the open source Spring frameworks, has developed the Spring Tool Suite (STS) Integrated Development Environment (IDE). The STS is based on Eclipse, so it will be familiar to many Java developers. STS adds a number of attractive features for developing Spring, Spring Boot and Spring MVC projects. STS can be downloaded here.
This Spring Boot example was created with STS. A complete tutorial on STS and Eclipse is beyond the scope of this discussion. However, a few pointers may help new STS users who are familiar with Java development using Eclipse.
- When creating a new Spring Boot/Spring MVC project: Select "Spring Starter Project" for a project with the Spring Boot initializer.
- In the project initializer dialog, select "War" (Web ARchive) under the packaging in the "New Spring Starter Project" dialog. The "war" packaging can be changed later to "jar" in the future by editing the Maven "pom.xml" file.
- For a simple Spring MVC project, select "Web" and "Spring Tools". Selecting "Web" will include the Spring MVC support.
Git Repository
The STS project for this example can be "cloned" from the public GitHub repository: https://github.com/IanLKaplan/spring-boot-example. In a shell window, type
git clone https://github.com/IanLKaplan/spring-boot-example.git
The application can be run as a Spring Boot App (in the Run menu). The application page can be viewed
at http://localhost:8080.
Project Overview
The project file structure is shown in the directory tree below:
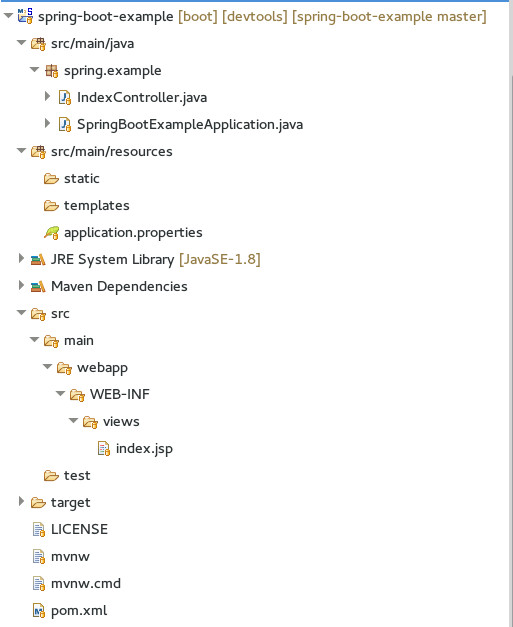
When you create a Spring Boot/Spring MVC project, the project builder will add a class with the Java main method. In this project the main method is in the SpringBootExampleApplication class. The class created by the project builder has been modified to extend the SpringBootServletInitializer base class. The configure is overridden to be specific for this class. This modified class is shown below:
package spring.example;

import org.springframework.boot.SpringApplication;
import org.springframework.boot.autoconfigure.SpringBootApplication;
import org.springframework.boot.builder.SpringApplicationBuilder;
import org.springframework.boot.web.servlet.support.SpringBootServletInitializer;

@SpringBootApplication
public class SpringBootExampleApplication extends SpringBootServletInitializer {

    @Override
    protected SpringApplicationBuilder configure(SpringApplicationBuilder application) {
        return application.sources(SpringBootExampleApplication.class);
    }

	public static void main(String[] args) {
		SpringApplication.run(SpringBootExampleApplication.class, args);
	}
}
This simple application does not have any "data model" components (for example, classes that are mapped to a database). The application consists of controller and view components. The controller handles web requests that are mapped to a Java function and an associated web page.
The controller class IndexController is shown below:
package spring.example;
import java.text.SimpleDateFormat;
import java.util.Date;

import org.springframework.stereotype.Controller;
import org.springframework.ui.Model;
import org.springframework.web.bind.annotation.RequestMapping;

@Controller
public class IndexController {

    /**
     * Controller function for the index HTML page.
     */
    @RequestMapping("/")
    public String index(Model model) {
        SimpleDateFormat dateFormat = new SimpleDateFormat("MMM d yyyy : HH:mm:ss:SSS z");
        Date now = new Date();
        String dateStr = dateFormat.format( now );
        model.addAttribute("time", dateStr);
        return "index";
    }
}
The controller class is marked with the Spring @Controller annotation. The class contains
a function named index which is marked with the @RequestMapping annotation
that defines the relative URL path for the Java Server Page that is associated with this function.
The code in the controller function will be executed before the web page is created for display. In this case the code in the function creates a formatted date/time String.
The structure for a controller function to handle web requests is:
                public String functionName(Model model) {
                   // function code...
                }
In this example the function name corresponds to the name of the JSP page index.jsp The HTML
for this page is shown below.
<%@ page language="java" contentType="text/html; charset=UTF-8"
    pageEncoding="UTF-8"%>
<!DOCTYPE html PUBLIC "-//W3C//DTD HTML 4.01 Transitional//EN" "http://www.w3.org/TR/html4/loose.dtd">
<html>
<head>
<meta http-equiv="Content-Type" content="text/html; charset=UTF-8">
<title>Spring Example Index JSP Web page</title>
</head>
<body>
   <h2>
     Spring Example Index JSP web page
   </h2>
   <p>
   This is an example of an index (root) web page, implemented as a Java Server Page.
   </p>
   <p>
   With cached web pages, there's always the concern that we're not seeing the current page, but
   a cached version. However, you can check the time and date:
   </p>
   <p>
   Time/Date: ${time}
   </p>
</body>
</html>
The STS Spring Boot project builder will construct a webapp project directory.
The WEB-INF directory was added "by hand". Under this directory a views
directory was added. The index.jsp page is in the views directory.
resources/application.properties
The resources directory contains the application.properties file. This contents
of this file was customized for this application. This is shown below:
                spring.mvc.view.prefix: /WEB-INF/views/
                spring.mvc.view.suffix: .jsp
                application.message: Spring Boot Example
The view and suffix attributes tell Spring where to find the view files that are associated with the controller classes.
Configuring the pom.xml file
The STS project builder will build the Maven pom.xml file. This pom.xml file
does not contain an embedded web server dependency, which is needed to run the application under
STS using the Run as ==> Spring Boot App option. To add an embedded Tomcat server add the following
dependency to the pom.xml file:
<dependency>
 <groupId>org.apache.tomcat.embed</groupId>
  <artifactId>tomcat-embed-jasper</artifactId>
  <scope>provided</scope>
</dependency>
To deploy a Spring MVC project as a web application on a Tomcat server (for example, under Amazon's Elastic Beanstalk) you will need to remove this annotation.
To test the application as it would be deployed with Tomcat, under STS you will need to add a Tomcat web server. This can be done under the Window dialog, under preferences. Select Server ==> Runtime and add the Tomcat server using the Add button.